
Dec 28, 2008
Nine Patch Quilt
Happy New Year to all the nice people that stop by my blog. May you have a good year. Here's an old fashioned nine patch that I'm making for a donation quilt. I won't have time to pin it to the backing and batting until next week. I thought that it was time to "get back to my roots" in quilting. I cut 4 inch wide strips, and join them up in threes. Then I cut those up into 4 inch sections, and I join into blocks. After that, I square the blocks up, and only then do I cut out the plain blocks, when I know what exact size to cut them. This quilt is not a regular size bed quilt, it only has 15 pieced and 15 plain blocks, finishing approximately 50 x 60 inches.
Dec 21, 2008
Unlovely Crochet blanket
Here is a warm-as-toast blanket. And it's free--I just used all the left-over sport weight yarn in my stash. I made this blanket several years ago, thinking that I was making a summer blanket, as it's only sport yarn and full of holes. Wrong--it's now my favorite winter warmer. First the flannel sheet goes on the bed, then this blanket and a few quilts on top of that. I "designed" this blanket as follows. Chain about 100. Turn, skip three sts and sc in next ch. Sk 3 ch, and sc in next st. At end of row, ch 3. Following rows: Ch 3, sc in first loop, *ch 3, sc in next loop. Continue in this pattern until you reach the width size of the bed you are making the blanket for. As you use up yarn, just join in another bit and keep going--there's no color or pattern here, it's just any sport-weight yarn you have on hand, or can buy from the close-out bin, or any odds and ends you can get from friends who may want to get rid of them. Make as many of these width lengths as you need for your bed--I have five width strips in my blanket. Then, crochet the widths together. As you come to the end of the rows, you will find that some are too short or too long. Adjust as necessary, by adding rows or subtracting. I found that with 5 width strips, I have enough blanket to tuck under at the foot of the bed.

Dec 18, 2008
The snow is snowing
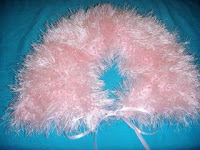
Well, the mountains are sprinkled with snow here, after the cold rainstorm we had. This is the view from where I live, Saddleback Mountain. And below is the delicious knitted collar for a little girl. It's made of Lion Brand Fun Fur. The pattern is on their web site. A neighbor gave me the yarn. So it's free! What a nice lady. I guess that she wanted to make a scarf with the yarn, and got disgusted with it. Believe me, it's a hard yarn to work with. And as if that's not bad enough, the directions called for using two strands held together. The good side of it is, no one will ever detect any mistakes made during the knitting process. Here endeth the knitting and crocheting for Holiday Gifts (I think).
 And below is the delicious knitted collar for a little girl. It's made of Lion Brand Fun Fur. The pattern is on their web site. A neighbor gave me the yarn. So it's free! What a nice lady. I guess that she wanted to make a scarf with the yarn, and got disgusted with it. Believe me, it's a hard yarn to work with. And as if that's not bad enough, the directions called for using two strands held together. The good side of it is, no one will ever detect any mistakes made during the knitting process. Here endeth the knitting and crocheting for Holiday Gifts (I think).
Dec 16, 2008
Now I have finally decided what I want to do. I don't like to be hanging around between projects for too long. I'm happier if I have something partially cut out and by the machine, ready for a few seams to be run up whenever there's a moment. Even if I'm on hold on the phone, I can put the phone on speaker and sew something. I've decided to make a bunch of plain old scrappy nine-patches. I cut strips 4 inches wide, join them and then slice into 4 inch sections. I plan to join the patches together to make a lap quilt for donation. I have no idea if I have cut out the right amount of patches, or how big the quilt will end up being. 

Here's the hat that goes with the mittens. I got the pattern from http://sandyfroglegs.blogspot.com/ I like the pattern, it's not too lacy for a man, easy to make, and requires no pompom on the top.

Dec 12, 2008
Crochet mittens
This is the last of my "series" on quick-to-make gifts, I think (unless something comes up). Anyhow, I dimly remembered that back in the stone age sometime, I had a set of directions for crochet mittens in every size. I must have lost those back in the mists of time. I hardly have any reason to make mittens around here in Southern California. But I have a grandson--who was kind enough to post on the blog here recently--and if you read what he wrote, mitts were mentioned! I browsed around the Internet lately, and what luck--I found those old directions (minus a picture), and recognized the pattern. The pattern makes mitts in a jiffy, and the mitts are stretchy and the pattern includes many sizes, and it lives up to the title of "Crochet Mitten's for the family" (I forgive the person who posted this pattern for her little slip in grammar.) The website where the directions come from is www.knitting-crochet.com

Dec 11, 2008
Crochet scarves: coming and going
Here's some more quickly made gifts. These scarves are made with the same stitch, but one was worked horizontally, and the other vertically. Although they are crocheted, they're not too lacy for a man. But a lady might like them too, as they are soft and warm. Just add a fringe, I guess. Anyhow, to make the horizontal one about 7 ounces of knitting worsted yarn is required and a size J hook. Chain about 150 to 160 stitches. Work hdc in third ch and in each ch across. For each following row: Ch2, hdc in the back loop of each stitch. Keep going until the desired size, or you use up the yarn. To make the vertical scarf, about 6 ounces of knitting worsted yarn is needed, and a size J hook. Chain 28, and follow the directions above, until scarf is length desired, or you run out of yarn.

Dec 9, 2008
I spy quilt
I saw a quilt I liked in Quick Quilts magazine. It was designed by Caren Zimmerman. It's not an "I spy quilt" in the magazine, but used various prints in the blocks. But I thought that the pattern would make a good I spy type of quilt. I have the blocks stitched together, but I have to make a border and acquire a suitable batting and backing for it. The blocks are cut 7 1/2 inches, and 4 1/2 inches and the strips are cut 2 inches wide.

Dec 7, 2008
Quick-to-make Gifts
I made the pillow below for a gift. I like to use the half double crochet stitch and work it in the back loop. That gives a nice, soft stitch and has a "knitted" appearance. For this pillow, I chained 50 using knitting worsted yarn and a size J hook. Hdc in third chain from the hook, and in each chain. Chain 2, hdc in the back loop for all the remaining rows. Make two pieces the same size. Measure the rectangle, add seam allowances and sew a pillow form to insert in the pillow. Crochet all around the edges, inserting the pillow form. 

If you are in a hurry for a gift, find some left over yarn and make a couple of granny squares, from 14 ot 16 inches square. Then measure, and make a pillow form. I made the pillow form out of a scrap of muslin and filled it with bits of left-over quilt batting. Crochet the squares together, inserting the form.

Here's a baby sweater that I made. I found the pattern on http://www.plymouthyarn.com/. I'm always searching for a pattern that is in knitting worsted yarn and takes 4 stitches to the inch. This little sweater is knitted from the top down, using some yarn that I had in my stash. 

Dec 5, 2008
And another one
This little quilt is made in the Chinese coin pattern. I think that the name comes from the fact that many years ago (I don't know if this is still the case) Chinese money came with a hole in the middle, so that it could be stacked up on a spindle. Sort of the equivalent of our penny rolls. I had one of those coins when I was a kid. Anyhow, it's also a donation quilt. And I have found a new place to donate it to, too. (Pardon the dangling participle, but my old English teachers don't read my blog. They would all be in teacher heaven by now, anyhow.) So what I have done is to join up with a lovely group of ladies who do needlework over at our civic center once a week. And we donate a lot of stuff that we make to help homeless people to get back on their feet, and overcome their homelessness.
To make this quilt in a hurry, cut long strips that are 2 1/2 inches wide and join up two or three at a time. Slice the strips into 4 1/2 inch wide pieces, mix them up, and join the pieces into 36 or 45 inch strips. Cut background fabric into 3 1/2 inch wide strips and join the quilt top together. Add borders. This quilt is approximately 33 by 41 inches.
To make this quilt in a hurry, cut long strips that are 2 1/2 inches wide and join up two or three at a time. Slice the strips into 4 1/2 inch wide pieces, mix them up, and join the pieces into 36 or 45 inch strips. Cut background fabric into 3 1/2 inch wide strips and join the quilt top together. Add borders. This quilt is approximately 33 by 41 inches.

Subscribe to:
Posts (Atom)


