 This is the Log Cabin Baby Quilt all quilted and completed! I have machine appliqued a duck in the center. And it has 4 inch strips of fabric sewn all around. Some of the strips are baby-type fabric and some are not. The quilt measures about 39 by 49 inches. The backing is made of flannel. I machine quilted it using the free-motion method. This method is so simple, I recommend it for any small quilt. Safety-pin baste the quilt. Lower the feed dogs, or cover them with a feed-dog cover, whichever your machine will do. Use a free-motion foot on the machine. Set the stitches to very small. I have a pair of gloves that I wear to help control the fabric. I sew a small strip at a time. It helps to practice on a scrap of fabric and batting before beginning.
Showing posts with label applique. Show all posts
Showing posts with label applique. Show all posts
May 2, 2011
Log Cabin Baby quilt
This is the Log Cabin Baby Quilt all quilted and completed! I have machine appliqued a duck in the center. And it has 4 inch strips of fabric sewn all around. Some of the strips are baby-type fabric and some are not. The quilt measures about 39 by 49 inches. The backing is made of flannel. I machine quilted it using the free-motion method. This method is so simple, I recommend it for any small quilt. Safety-pin baste the quilt. Lower the feed dogs, or cover them with a feed-dog cover, whichever your machine will do. Use a free-motion foot on the machine. Set the stitches to very small. I have a pair of gloves that I wear to help control the fabric. I sew a small strip at a time. It helps to practice on a scrap of fabric and batting before beginning.


Apr 1, 2011
Heart applique wall hangings

 Here they are, completed wall hangings. If you look closely you will realize that they are each unique. Similar but not the same--appliques or buttons. And the manatees are swimming on the fabric background. I'm fascinated by those creatures. And although they are bulky, it's nice to know that they are vegetarian and will not take a bite out of swimmers!
A few notes about the sewing construction: First the appliques were made by drawing the heart shapes on the back of iron-in non-woven interfacing. These were placed sticky side to right side of the fabric, and then sewn all around the whole edge. Trim seam, cut a small slit in the interfacing. Turn right side out. And there you have it, the edges are turned under. I hand sewed the appliques to the wall hanging using black embroidery thread and a blanket stitch. Secondly, I didn't sew any binding, I just did a pillowcase turn. I used a solid blue backing, that matched the edges of the wall hanging. Thirdly, I didn't use batting in the wall hangings but I interlined them with flannel. I didn't use any new flannel either, I had a discarded nightgown (washed of course) and I cut the interlinings from the skirt. I edge stitched the wall hangings, catching in a flap of fabric to use for the curtain rod later. But I didn't hem that down in the back until after I had sewn on the button trims.
I hope that I explained that all OK. Actually, it's a very simple sewing method.
Now back to work on my two other quilts that need quilting!
Dec 26, 2010
Dove quilt
This is the Dove quilt completed. Now I have to do the application process at http://www.alzquilts.org/index.html because this quilt is to be donated to the great cause of medical research to find help for those suffering with Alzheimer's Disease. It took six hours to make. It's an original design of mine. And I hand appliqued, embroidered and quilted it. But it's quite tiny, under 9 by 12 inches. The embroidery stitches are blanket stitch and fly stitch. Now on to the exciting topic of Tonya Ricucci's book Word Play Quilts. I'm the proud owner of a copy. It's so well written. And the illustrations are excellent. Tonya, it's a triumph! I'm sure that it will be a popular book with quilters, and words will be sprouting up on all sorts of quilts. Furthermore, the book has a great deal of humor, and it's entertaining. That's a big achievement for a technical book. For anyone who has been in the Antarctic for the past few months, Tonya's blog is http://lazygalquilting.blogspot.com/
 Now on to the exciting topic of Tonya Ricucci's book Word Play Quilts. I'm the proud owner of a copy. It's so well written. And the illustrations are excellent. Tonya, it's a triumph! I'm sure that it will be a popular book with quilters, and words will be sprouting up on all sorts of quilts. Furthermore, the book has a great deal of humor, and it's entertaining. That's a big achievement for a technical book. For anyone who has been in the Antarctic for the past few months, Tonya's blog is http://lazygalquilting.blogspot.com/
Oct 10, 2010
Stars Baby Quilt, ready to be quilted

And another thing, I'm reading a cute book That Dorky Homemade Look by Lisa Boyer. It's an amusing book about sewing quilts. A quote: "Give it (the quilt) to someone you love dearly. They must drag it around the house, wrap themselves up in it when they have a fever, spill something brown on it..."
Oct 3, 2010
Star baby quilt--the beginning


Well, I was a bit under the weather for a few days, in more ways than one! Besides my not feeling well, we went from having comparatively cool type weather all summer to having the hottest day ever recorded. It was as if all that summer heat that we had avoided decided to hit us in only one day! Lucky me, I had my AC repaired recently, and it was up and running for that blast of heat. And people say that we have no weather to speak about in Southern California.
I have begun sewing a baby quilt, which was the next thing on my sewing list. I turn under the edges of the stars by sewing them to fusible interfacing. Placing right side of fabric to sticky side of interfacing, I sew all around the edges, then I cut a little hole in the interfacing and turn the star right side out. Presto, all the edges are turned under. I then press the stars to the quilt square and machine sew the edges. I plan to make alternate squares in a free-pieced crazy square. I have a lot of scraps of kid-type fabric left over from that I Spy quilt that I made. So now is the perfect time to get some of them sewn up.
Jul 5, 2010
More details, and the beginning of Sabrina's quilt


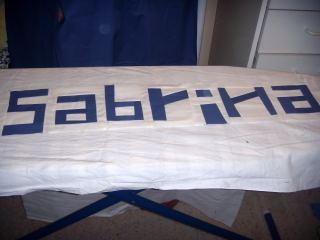
Here I go--I began with Sabrina's name as I started making her quilt. I finally decided to choose blue for the lettering. Lots of blocks to follow--that will be fun for me. And I'm posting close-up photos of the applique blocks that I made on Jenna's quilt. The house block is a very simple one, with embroidered running stitch edges on the house, and on the door. The hearts are embroidered with white blanket stitch.The bird is embroidered with black blanket stitches, and has a French knot eye and chain stitched legs. The flower pot is made with a running stitch around the edge. The flowers have white blanket stitch around their edges and French knots decorate the centers of the flowers.
Jun 29, 2010
I changed my mind--again

I was so excited today, it's time for me to lay out the blocks for this quilt. I just have a bit more embroidery to do on the flower appliques. I spread out the blocks on my bed (no design wall for me--my quilts are intended to be put on beds anyhow, not hung in a museum). I got out my big tape measure and my calculator and started planning the sashes. Sashes were in my original sketch for this quilt. I had that all figured out. I was trying to decide on the color of the sashes--and then I took a closer look at this photo. Guess what, I decided that I don't need sashes! I think that I just need to square up these blocks, cut out some yellow blocks to go on each side of Jenna's name, and sew it all together. Then I'll add a border to the edges. Meanwhile, back at the ranch, I have washed some cute flannel for the back of each quilt--although Sabrina's quilt is only a thought in my head at the moment, I already picked out a backing for her quilt. There's a lot of quilting to do!
Jun 17, 2010
Is it embroidery or?

Do you call this embroidery, or am I simply too lazy to remove the basting? I've been making some larger-sized appliques by this method that I invented for a few years now but I never fessed up to it before. First of all, for this particular (about 7 inch)applique shape, I saved the cardboard insert from a heart-shaped box of chocolates. Those chocolates were a gift quite a few years ago. The candy is long gone, but the heart-shaped cardboard endures. I placed the cardboard on the right side of my fabric and traced around it with a piece of chalk. Then I cut out the heart with a quite generous seam line--larger than for a regular applique--OK I better go and measure--alright, it's 1/2 inch seams. Clip the seam where necessary. In order to prepare the applique for sewing, I used to baste this hem in place, press it, and then rip out the bastings. So I said to myself, "Self, why am I ripping out perfectly good stitching?" So now what I do is use embroidery thread when turning under the edges, and leave it there--presto, an embroidered applique! I have now pressed it, pinned it in place, and it's all ready to be sewn down.
Oct 13, 2009
Sunflowers wall hanging
I made this wall hanging first of all to illustrate what can be done with an old pair of cast-off jeans. The blue background is a pants leg! Because the jeans were still good, but a bit worn, I found that it was easy to sew on and to hand applique the flowers. And it proved to be simple to hand quilt, also. I was lucky enough to have a spool of navy blue hand-quilting thread handy. There was no picture or plan of the quilt made beforehand. I just had an idea in my head. But I must say that spontaneity requires forethought. I bought a couple of yellow fat quarters with this quilt in mind. After I made the flowers (see previous post for how I made them,) I just did a bit of "flower arrangement" to decide the placement. I think that old jeans would make good pot holders, baby bibs, and so forth. This is my contribution to recycling ideas. I've been doing recycling since the days when only ladies who wore long dresses and love beads cared about recycling and eating whole wheat bread!

Sep 30, 2009
Applique wall hanging
 I have the wall hanging pinned together. I designed the applique myself. It's not copied out of a book. The blue in the background is a piece of an old pair of jeans. I may add a couple of extra leaves, I'm not sure yet. The green flower stems were made using bias and sewn using a set of bias bars. I have found that that's about the easiest way for me to make stems in flower appliques. I plan to hand hem the appliques to the background, and I'm not sure if I'll embroider them with blanket stitch. I like to make things up as I go along.
Apr 18, 2009
Blogger's Quilt Festival
I don't usually go in for blog contests, but this is such a big one, and so much fun. Here's my entry. It's a simple four patch quilt. Except that I added applique blocks here and there, and even a redwork square. As a matter of fact, the teapot that I use for my logo is appliqued on this quilt, but it's on the side. That's why I used the teapot for my logo, it's tucked away in the corner, and would never be seen otherwise.
Why did I make this quilt? For thirty years or so, we lived in a little house and had a full sized bed--couldn't fit a bigger one than that into our bedroom--and that was the "master bedroom." When we moved in 2004, one of the first things we did was to buy a queen-sized mattress. So I needed a queen sized quilt! And this was the one I made. Those three patchwork and appliqued love hearts were on my husband's side of the bed--I put them there on purpose. I also appliqued a pair of lovebirds on the quilt, not visible in the photo.
Why did I make this quilt? For thirty years or so, we lived in a little house and had a full sized bed--couldn't fit a bigger one than that into our bedroom--and that was the "master bedroom." When we moved in 2004, one of the first things we did was to buy a queen-sized mattress. So I needed a queen sized quilt! And this was the one I made. Those three patchwork and appliqued love hearts were on my husband's side of the bed--I put them there on purpose. I also appliqued a pair of lovebirds on the quilt, not visible in the photo.

Oct 16, 2008
Wonky Dresden plate quilt
Here it is, finished at last. I used the same fabric for the binding as for the borders. It is free-motion quilted. I don't know why I made this quilt, it was an impulse. That could be a title for a book--the Impulsive Quilter. I used Jan Mullen's book "Free & Eazy Circles," for making the quilt, except that I made my own modifications to the instructions, I used muslin for the foundations for the circles. And I found that if I made a running stitch around the circles, they were so much easier to applique. The circles are all hand appliqued to the background. I used all kinds of scraps for the quilt, even the backgrounds were bits of solids. 

Sep 28, 2008
Dresden Plate quilt
 I'm making this wonky Dresden plate quilt. I got the instructions from the book "Free & Eazy Circles" by Jan Mullen. I used muslin for the foundations for the circles. I have to quilt it now. I plan to free motion quilt. This quilt is smaller than what I usually make. I don't know why, but I decided that 12 blocks were enough. I really enjoyed hand-appliqueing the blocks to the foundations. I used any light solids I could find for the foundation squares. I have quite a large piece of the brown that I used for the sashes.
 Next, I hope to make a donation quilt following the ideas in the beginning chapters of Gwen Marston's book "Liberated Quiltmaking." And I still have that table runner that I put aside several weeks ago. I'm doing some knitting lately, but I don't want to show pictures because they are a present, and the recipients have been know to glance at the blog from time to time.
A little bit of quilting-type excitement for me. After all these years of quilt making I discovered something called "utility quilting." I do vaguely recall seeing a quilt in an old book that was quilted with cross stitch, but the idea never registered. I got my hands on a book published in 1991 called--I'm not kidding--"Rotary Riot" by Judy Hopkins and Nancy J. Martin. And in the very back pages, it describes quilting by hand using cross stitch, fly stitch (the authors call it "crow footing") buttonhole stitch, Mennonite Tack, and Methodist Knot. These stitches are used instead of tying the quilt. And I do believe that the method looks neater and quicker that tying. The process involves taking one of these stitches on the quilt using a long needle, and then sliding the needle through the batt, to the next spot. The fly stitch is the one that appeals to me. It's a stitch any one who embroiders would know.
Sep 16, 2008
Tree Wall Hanging
Here's my tree wall hanging, I finished it. I designed this myself, so all the blame is on me. It's hand appliqued and embroidered. I included the Bible verse on the bottom. That's where my idea came from. I like to make a double line of quilting on wall hangings. My arthritis is too bad to be quilting a whole quilt, but I can get away with a small piece. I thought that I should take two photos, one showing a close-up. Of course, I put the photos on the blog in the wrong order. I do that often. I did make a hanging tunnel on the back, but I generally hang my wall quilts on a pants hanger on a door. Then I can switch them around, for different holidays or seasons.


Sep 9, 2008
A new direction

I'd like to thank The Liberated Quilter's Web ring for inviting me to be a member. Such wonderful quilters. And while I was at it, I rearranged my blog a bit. I have moved my reading list to a link. I'm trying to list some of my books on the librarything web site now.
Now, on to the adventures of my fungly quilt. I had sewn on most of the binding on Saturday night, and completed it on Sunday morning. I had the luck to notice one of my neighbors outside and she was kind enough to hold the quilt up for a photo. In the afternoon, my daughter came over and I showed her the quilt. "Perfect for my new Hammock!" she said. They have a hammock under a canopy in their yard. So that quilt was finished and found a home on the same day.
Now on to my quilting. Above is a photo of a Dresden plate pattern pillow that I made quite a few years ago. The little cross stitch house has snow on the roof (no snow where I live)--but never mind. Dresden plate is one of my favorite patterns. Once upon a time, a long, long time ago, I made a Dresden plate quilt. It was hand stitched and quilted one block at a time, and then I joined the bl ocks together. We used it to tatters. Anyhow, I thought that I might like to make another Dresden plate quilt, but not that kind, even though I have the plastic template and everything. So I purchased Jan Mullen's book, "Free & Eazy Circles." I wanted a liberated version. Then I tried to make a sample block. Jan Mullen calls for a cotton batting as a foundation for the ring. Well, I don't have cotton batting, and even if I did, it would make so much lint in the bobbin. I don't know why, but she never thought of a muslin foundation. I tried that and it worked fine. You then hand applique the wonky result to a block. I like it. I will probably make a quilt of these circle things. About muslin, I used to sew with it a lot, and my old Dresden plate quilt was made with it as the background. I still have a bunch of it laying around here and there. But lately I've gotten fancy and I generally use "quilter's cotton" in a neutral color instead. I remember the days when the old Montgomery Ward store used to advertise white cotton sheets for $2.50 during white sale days (they were loosely woven, not tight like the sheets they sell now). I would phone the linen department at opening time and ask the lady if she had any of those sheets in the ad. If she did have any, she would only have a few, they were a loss leader. I would say, "This is Rosalyn, and I'm coming right down, hold one for me." I would take that sheet, wash it, and cut it up for my quilts.
 ocks together. We used it to tatters. Anyhow, I thought that I might like to make another Dresden plate quilt, but not that kind, even though I have the plastic template and everything. So I purchased Jan Mullen's book, "Free & Eazy Circles." I wanted a liberated version. Then I tried to make a sample block. Jan Mullen calls for a cotton batting as a foundation for the ring. Well, I don't have cotton batting, and even if I did, it would make so much lint in the bobbin. I don't know why, but she never thought of a muslin foundation. I tried that and it worked fine. You then hand applique the wonky result to a block. I like it. I will probably make a quilt of these circle things. About muslin, I used to sew with it a lot, and my old Dresden plate quilt was made with it as the background. I still have a bunch of it laying around here and there. But lately I've gotten fancy and I generally use "quilter's cotton" in a neutral color instead. I remember the days when the old Montgomery Ward store used to advertise white cotton sheets for $2.50 during white sale days (they were loosely woven, not tight like the sheets they sell now). I would phone the linen department at opening time and ask the lady if she had any of those sheets in the ad. If she did have any, she would only have a few, they were a loss leader. I would say, "This is Rosalyn, and I'm coming right down, hold one for me." I would take that sheet, wash it, and cut it up for my quilts.
Jun 29, 2008
The Glorious Fourth
 I want to wish a Happy Fourth of July to all. I made this wall hanging several years ago, and hang it up every year at this time. As you see, I just put it on a hanger and hang it on the door of the hall closet. I've been hunting through all of my files trying to find the pattern I used, as I would like to credit the designer of the wall hanging. But no luck there.
Cheri Sullivan wrote in and asked about the quilt I started, and the answer is yes--The crazy patches will just be the center stripe in the Roman Stripe design. Actually, crazy patches can be used instead of regular fabric as part of the design for any number of simple quilt blocks, like nine patch, windmill, shoo-fly, etc. I guess that's why I can use an empty coffee can next to my sewing machine for any scraps I'm throwing away, as they will be very tiny. I use two laundry hampers to store my scraps. No matter how many scraps I use, it seems that those hampers are always full to the brim!
May 20, 2008
Applique hearts
 I made this quilt a few years ago. I saw a photo in a magazine. It's basically machine and hand applique, and hand blanket stitching with black. I just use it as an ornament in the living room. It's one of those useless-type quilts most of us make. It was fun sewing on a bunch of old buttons that have been collected over the years.
 Apr 8, 2008
Tea Cup Quilt

 Here are pictures of the Tea Cup Quilt! I'm very proud of this quilt. I hope that my little granddaughters will like their quilts. I just have to label this one. I used a lot of scraps in my stash for this quilt. I made the tea cup handles by making bias with bias bars, and hand appliquing in place.
Mar 26, 2008
A bit of progress
 So, I've finished appliqueing those flowers and leaves by hand, unto the side edges of the tea-cup quilt. And I've pin basted half of the butterfly quilt. It's time to lower the feed dogs on my sewing machine and go to town with the meandering quilting. As per usual, I'm making two quilts at once! Well, not always. I'm planning to make the next quilt all by it's own self. That quilt is something I keep tossing around in my mind. One thing I'm sure of, I know who the recipient is. She doesn't know about it, though. Lately I've been thinking about making a half-log cabin or some other kind of string quilt. I reserve the right to change my mind, that's part of the fun. I have a pretty good sized library of quilt books. But sometimes I read a lot of them, and then embark on my own idea, anyhow.
Mar 18, 2008
Easy applique method
I'm still working on my teacup quilt. I decided to applique a few scattered flowers and leaves on the side edges, as the border looks rather wide. I think that appliqueing on the top and bottom edges of the border would probably be a waste of time, as the quilt is going to be used on a bunk bed. I like to use Eleanor Burns' method of applique. I follow an old book of hers "Sunbonnet Sue Visits Quilt-in-a-Day." ( I inserted those hyphens myself--in case anyone hasn't heard of Eleanor Burns and her Quilt in a Day books.) It 's very easy. I use fusible interfacing (the stuff for sewing, as opposed to the fusible stuff for quilts.) I face each piece. I trace the pattern on the back of the interfacing, and place sticky side to the right side of the fabric. I use a clear see-through foot on the machine and a short sewing stitch. I can turn down the speed of the sewing on my machine. I sew on the traced line. Then I trim the edges, and snip the concave curves. I cut a little slit in the back of the interfacing and turn right side out. I find that the back of a plastic crochet hook and a piece of a soda straw help with the turning. I press the edges with an ice-cold iron. Then I use a pressing sheet underneath, position the appliques and using a press cloth and steam iron, I press in place. And they are all ready to applique with whatever sewing you want. I slip stitch by hand, or embroider with pearl cotton or embroidery thread. Or I machine sew with a fancy stitch on my machine.
Subscribe to:
Posts (Atom)


