Jul 31, 2009

I'm finally starting to tie my medallion quilt. If you notice the "dish" there with my thimble and semi-circular needle in it--this is my recycling tip. I cut off the bottom of empty plastic milk cartons and use them to hold thread ends, pins, or whatever. Very handy and they are free! You can cut the dishes to be short or high. So useful for the discarding of thread or yarn ends. And they can still be recycled some day. I'm using crochet bedspread cotton thread for my tying. I make a surgeon's knot. It's like a reef knot but with one extra turn of the thread. Oh, and underneath the quilt, I place a cutting mat to protect the table surface.
I should tell the story about the time I was invited to a quilting bee. It was about 36 years ago. I knew this lady named "Dolly" from my Mother's Support Group (Le Leche League.) And her mother phoned to invite me, "Because Dolly hasn't many friends and she knows you." Anyhow, I arrived at the home and there were several ladies there who were relatives of Dolly. The first thing that happened was a rather awkward moment for me. A gentleman entered the room and gave an invocation. I wasn't aware that prayers were required at a quilting bee! Anyhow, it was not of my Faith, so I just had to sit there awkwardly. I guess that I wasn't making much of an impression. Then they stretched a nine-patch quilt on a quilting frame and proceeded to tie it with red wool. I didn't do so well at that either. I don't think that I had ever tied a quilt before. Anyway, I was cutting the wool too soon or something, and wasting yarn. "Oh, who cut that yarn?" So I sat on the sidelines for a while and then I went home early!

Jul 27, 2009

Post 300

I started this blog a couple of years ago now and here is my 300th post. I've stuck with it and I do enjoy blogging very much. I've met so many wonderful folks on the Internet. I decided that in honor of this occasion, I would post a photo of my oldest (still existing) quilt. I guess that I made it back in 1968 or 1969. It's all hand done. It was made one triangle at a time by cutting a square and lining it with a piece of scrap flannel. Seams were pressed to the inside. Then each square was folded into a triangle with a little bit of batting inside, and the triangles were all hand sewn together. So the quilt is completely reversible. The seams do have a tendency to come apart easily, and the quilt requires some quick mending on a regular basis. But it is as usable now as on the day it was finished.

Jul 24, 2009

Log Cabin Table Runner

Would you believe this--my sister phoned me yesterday to ask if I was OK because I hadn't posted a Wordless Wednesday photo! I had better keep on my toes around here. I'll try for two next week--how's that? This is what I was doing instead--I finished hand quilting my table runner. That's how four orphaned blocks found a new home. Luckily, I found a nice piece of bias binding that was left over from I don't know when. So that's how I can have a new table runner for no cost. And besides that--I also managed to pin baste my medallion quilt. The teapot in the photo that looks like an antique is from a bargain store. It's small--just enough to make a couple of cups of herb tea. My favorite herb tea is raspberry. A nice cup of raspberry tea will settle the stomach better than any medicine. I used to drink chamomile tea but I found out that it counteracts certain prescriptions. A person has to be so careful these days. I had to give up eating grapefruits altogether because they counteract my prescriptions. And I found out that ginkgo, while it is a lovely tree--should be taken as in pill form with much caution--it can really mess you up with your prescriptions.

Jul 20, 2009

The Whole Truth

Here it is! the Whole Truth. I decided to adorn it with these folded fabric flowers and buttons. So that's the finished wall hanging. With fringes. It is 17 by 16 inches, not including the fringe. I added a hanging sleeve in the back--but I just hung it up on a pants hanger.

Now to make these folded fabric flowers I started by cutting out circles. Most of the circles were cut 3 1/4 inches in diameter, because my Homeowners Association sent me their financial report on this nice small size CD. I never read it, but I immediately recognized it as a perfect template for circles. In order to turn the circles into these hexagons, they are merely folded and pressed. I found a web site that gives directions for these flowers. And it is by Nancy Mahoney, an author of quilting books. I tacked the flowers on by sewing the centers a bit to hold the points in place. And then I sewed on a button. It's easier than appliqueing flowers and also it's three-dimensional.

http://www.nancymahoney.com/files/Play_Date_Flower_Pot_pattern.pdf
One of the pleasures of making the wall hanging was not planning ahead very much. I would just go to sleep every night and hope that I had an idea of how to proceed the next day. That helped me to solve problems of how to apply the backing, and so forth.


Jul 19, 2009

Getting to the Truth

The "truth" now has fringes and a backing. I added the backing in two pieces that overlapped. Like making a potholder (see my previous posts about making potholders back in the Spring sometime.) I made sure that there was a selvedge edge in the center, so I could just stitch the opening closed. The fringes are made of strips that I folded and machine stitched. Onward--

Jul 17, 2009

The Truth marches on

What I did was to mark the edge that I was going to cut off with a chalk line. Then I hunted through my stash for a piece of plain white flannel. I often use white flannel to back things that I plan to embroider. It makes it much easier to manipulate the fabric and it's really helpful if you are planning to embroider on thin fabric, such as gingham. Sometimes I do "chicken scratch" embroidery on gingham. A piece of flannel can also be inserted in a quilt behind an applique block. Anyhow, back to the subject--I machine basted the flannel to my wall hanging and then I started to do feather stitches on the red strips. I think that the next step will be to trim the edges and to add the fringes that I sewed, and the backing. I sewed a bunch of fabric strips to make fringes. I don't remember seeing wall hangings with fringes, but so there! After that, I plan to add more things. For instance, flowers, beads and buttons, maybe. Meanwhile, back at the ranch--I'm so proud of this sweater that I knitted for my daughter. I actually had to order the buttons from e-bay. I wanted to buy a big bunch of white buttons because I need them rather often for my knitting projects. Of course my daughter doesn't need the sweater right now, as she lives in Florida and it's July! But that's OK, I'll store it away for a couple of months. Meanwhile, I started on sweaters for my grand daughters that live in Las Vegas. It's 100 degrees there--but it does get a bit cold in the winter. Besides, it will take me a while to knit three sweaters--I hope to get them all done by December.


Jul 14, 2009

Embellishing the Truth

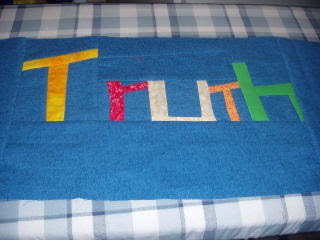
I've decided to do embellishing. I want to add fringes and trims to this wall hanging. The first decision is that I'm going to back the hanging with a piece of flannel, not batting. And I want to do some embroidery. Shh--I might even try some beading. Right now I've rounded up some left-over strips of fabric, which is very easy in my sewing room, and I'm sewing them into fringes. And looking at the photo has made me think that I have the blue edges too wide, I guess I'll have to trim. To be continued---

Jul 10, 2009

The train is coming

This is what the letters look like now that I've sewn them together. I have to decide what to sew on the top and bottom. Probably some strings or blocks. I thought of the word "Truth" because it's in one of my favorite prayers. And now, the Orphan Train is rolling on, as Finn would say. http://orphantrainsfromfinn.blogspot.com/
I have dug out some orphan blocks and joined them, to make a table runner. This I'm planning to hand quilt. That might take a bit of time, as I'm knitting three things (and have the yarn for more), joining up afghan squares (I hate that job, so it takes me longer to join the squares than to crochet them), and crocheting some flowers (I only made one of those so far.) But the orphan blocks are in the queue.


Jul 7, 2009

Coverlet

How about this, I finished making the string quilt. Actually, I think that this is a coverlet, not a quilt. There is no batting. I sewed together scraps of flannel and then I made a flannel back. Isabella wrote in a comment asking for the pattern. Isabella, there's no pattern. Just put together scraps--these are flannel as it happens, but it could be regular fabric. If the fabric is already in strips, you're all set, if not, use a scissors or rotary cutter and make strips of any width. Press the strips. I joined the strips and then I trimmed the edges. I had three different lengths of strips, as you can see in the photo. I made a pillowcase turn, so that means there's no binding. Afterwards, I pressed and then I top stitched. I did some sewing machine tacking to keep the layers together. So actually, there is absolutely no hand stitching. I made this coverlet for a charity donation.And more good news--I went to the post office and shipped those sock toys that I made for my grand daughters. I know that they check out my blog--so girls, look for a little package in the mail.

Jul 5, 2009

I hope that you had as great a Fourth of July as I did--got together with the family. We ate hot dogs and macaroni salad. And after dark, we climbed a nearby hill to see the fireworks going off in the distance. It was a lot of fun.
There'll be a pause until I obtain a quilt batt for the medallion quilt. Meanwhile, I started sewing my leftover bits of flannel together. At first I was thinking that I would sew some strips and then cut the sewn bits up and make them into squares--but I got kind of carried away and before I knew it, I had bunches of sewn-together strips. And so then I decided to make one of those old-fashioned string quilts instead. I've got two different lengths so far, and I guess I'll try to make three different sets of strips. To be continued----

Jul 2, 2009

Sock dolls

I made my first stocking doll when I was about 12 years old. It had button eyes and I found a big old button that looked like an acorn for the nose. I hunted around in a couple of stores that had inexpensive tube socks, and I could only find white ones. Oh well. The limbs and tails are made from bits of old t-shirts (left-overs from making a t-shirt quilt.) These sock dolls are for school-age children. If making them for babies and toddlers, don't use button eyes, embroider the eyes instead. I turned the socks inside out, and stitched the top of the heads to form the ears. They are stuffed with left-over quilt batting (what else?) I stitched up the bottoms while inserting the legs. Then I used some quilting thread to sew on the arms and tails. (The rabbit has a pom-pom tail.) I gathered the necks. Then I made crochet chains for the neck bows. And I sewed on buttons and did a bit of fast embroidery for the faces.