Here's how things stand with me right now. I have completed sewing the top of the denim quilt and the backing has arrived. Because I'm using flannel, I have to wash it first. Flannel can shrink like the dickens. At least it will only shrink the once, that's the first time it's washed in hot water. And so it's in the washer right now! And meanwhile, I'm making a start on that wall hanging that I wanted to make using a piece of an old pair of jeans for the background. I like to use this method of turning under the applique if the pattern permits. And since I'm designing the pattern, it does permit.
First I use a number 2 pencil and I trace the pattern on the non-sticky side of non-woven fusible interfacing. Leave at least 1/2 inch between patterns.

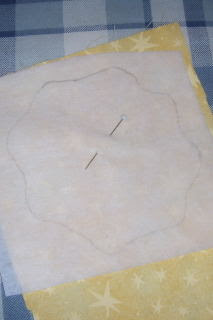
Cut out around the patterns leaving at least 1/4 inch on the outside edges. Pin the interfacing to fabric, sticky side to the right side of the fabric.

Set the sewing machine to a short stitch and use a clear plastic foot, if you have one. Sew on the drawn line using a slow speed. Having a needle-down setting on the machine is handy for this. Trim seams to a bit less than 1/4 inch and clip curves. Then cut a slit in the back of the interfacing, sort of an "X", and turn the applique through to the right side.

Using a pressing sheet and a small iron (if you have it--if not just use the tip of the iron). Press the edges only (leaving the center sticky stuff for attaching the applique to the background later.)

I generally hand hem and embroider the edges. But sometimes I machine applique the edges using a decorative stitch.
 Cut out around the patterns leaving at least 1/4 inch on the outside edges. Pin the interfacing to fabric, sticky side to the right side of the fabric.
 Set the sewing machine to a short stitch and use a clear plastic foot, if you have one. Sew on the drawn line using a slow speed. Having a needle-down setting on the machine is handy for this. Trim seams to a bit less than 1/4 inch and clip curves. Then cut a slit in the back of the interfacing, sort of an "X", and turn the applique through to the right side.


1 comment:
I'm going to use flannel for the first time on my boy quilts and I thought I wouldn't bother washing it. Geez, I hate the ironing thing, so thought a little shrinkage would be ok. No?
Post a Comment